Users now can sign documents without having to print and scan documents or leave ShareSecure. The following steps will walk you through the process of requesting a signature on a document in ShareSecure.
To Request a Signature
- Via the Quick Create Drop Down, select “Document” under “Create New” if the document you would like signed has not already been uploaded to ShareSecure.
- On the document upload page, select a document to upload either via a) the drag-and-drop loader, or b) the file selector.
- Confirm your upload settings, including the people you plan to share the documents with and select “Save Documents”.
- Navigate to the document you just uploaded either via the activity feed or via the search bar. Once on the document page, scroll to the bottom. You will see the section titled “Signature Requests”.
- On the signature request page, you have several options for requesting signatures, who will sign, where users will sign, and how users will be notified.
- Check the box if you would like to sign the document before it goes out to end users for signatures
- Checking the box will request signatures from everyone the document is shared with. Unchecking this box will allow you to manually select individual users or groups.
- By default, each user receives a copy of the document to sign. However, checking the “Automatically Generate a Signature Page” box will place all signatures in one document.
- You may also select how signature locations are determined. By default, ShareSecure will append a separate dedicated signature page for the end user with their name email, and place to sign. However, you may manually select where the signature will be placed.
- Lastly, if your document has embedded tags, ShareSecure will automatically display the signature locations to the end user when you select the box that states, “Document has embedded placeholder tags”.
- Similar to sharing a document in ShareSecure, you may opt to not send a notification email or add a custom message to your notification (which notifies the end user that their signature is requested). Just select the box stating, “Don’t send a notification email about this request to signers”.
- You may also customize the message that goes out to end users when they are notified of a signature request by clicking the blue link that reads. “Add a custom message to notification email”.
- Once you have confirmed your settings, select “Send Signature Requests” to proceed!

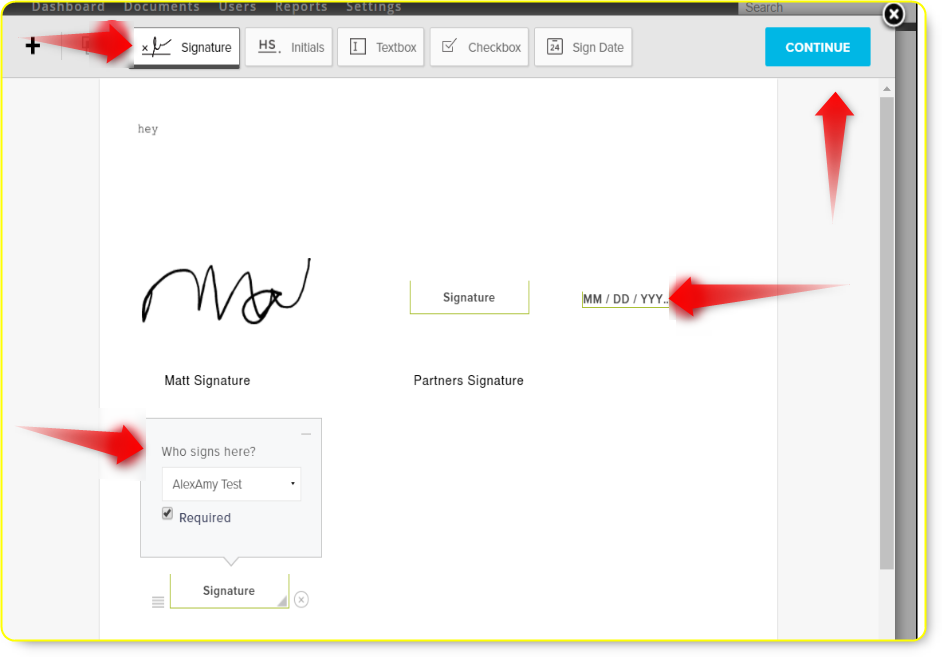
When manually indicating signature locations, the next step will ask you to indicate on the document fields for your end users including, Signatures, Initials, Textboxes, Checkboxes, and sign dates. To add these fields to your document, simply drag and drop the fields onto the corresponding pages and areas of the document.
*NOTE: Manually selecting signature locations is only for documents where you are requesting signatures from a single user. You will need to request signatures and manually indicate the signature location one at a time for each user that you would like custom signature locations.
Please also note that when you drop a field on the page, it will ask you to select whether “you” the admin will be signing, in or the end user.
6. Select the blue “Continue” button in the top right when you are satisfied with your field locations. As an admin, your dashboard will a) display the number of documents that are awaiting end user signatures and documents awaiting your signature. The Activity Feed will also display b) activities related to signatures.
To Sign a Document
- Upon signing into ShareSecure, under “Needs Your Attention”, you will see documents that are awaiting your signature.
- Select the document.
- Under actions, select “Sign”.
- Select “Click to Sign”.
- The signing wizard allows multiple ways to sign. You may either Draw your signature, type your signature, upload an image of your signature, or even use your smartphone to sign your signature with your finger. Whichever option you select, the wizard will guide you.
- Once you have signed, be sure to select Continue in the upper right corner.
- You must agree to be legally bound by the document to confirm your signature and continue.
Congratulations, your document has been signed with no printing, scanning, or uploading!