
The Form Widget brings a simple yet powerful way for General Partners to capture investor inquiries, requests, and feedback directly from Limited Partners and contacts through the widget in the VDR/Portal landing page (if enabled). Submissions flow straight into your CRM, automatically linking to existing investor records or creating new ones to ensure no interaction is missed. It centralizes communication to strengthen investor engagement, accelerates fundraising and relationship management by simplifying request tracking and responses, and removes the need for third-party tools by leveraging built-in CRM integration.
Who it’s for:
- Fundraising:
- GPs collect investor interest in funds and due diligence materials.
- LPs or prospective investors submit inquiries about opportunities in the data room, which are automatically linked to the CRM.
- Investor Relations:
- GPs manage investor requests for capital calls, fund updates, bank information, and reporting.
- LPs ask questions, ensuring a direct trackable workflow in the CRM.
Pre-requisite:
- Landing Pages are enabled in your Hub environment, and the user is an Admin in the workspace.
- Ensure you know how to build a Landing Page. Check out the VDR/Portal Landing Pages user guide.
- User has Admin access and is familiar with how to ‘Add Related Lists to the Page Layout’ and ‘Add and Customize Tabs on Lightning Pages Using the Lightning App Builder’.
Steps in the VDR/Portal:
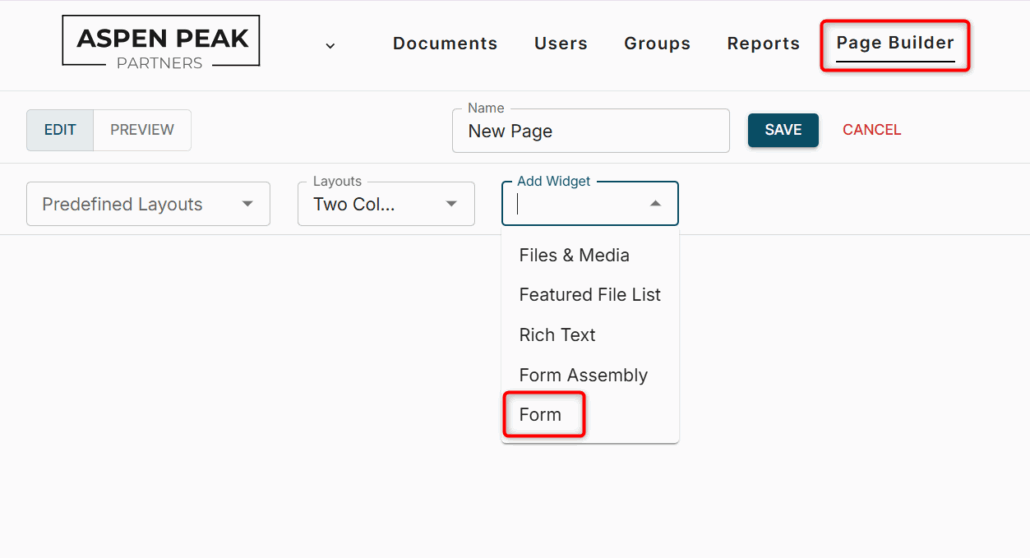
- Navigate to the Page Builder tab and either create a ‘New Page’ or ‘Edit’ an existing page.
- In the ‘Add Widget’ dropdown, select ‘Form’.
- Set a pre-filled subject in the ‘Form Subject’ field (e.g., “Fundraising Inquiry” or “Investor Update Request”).
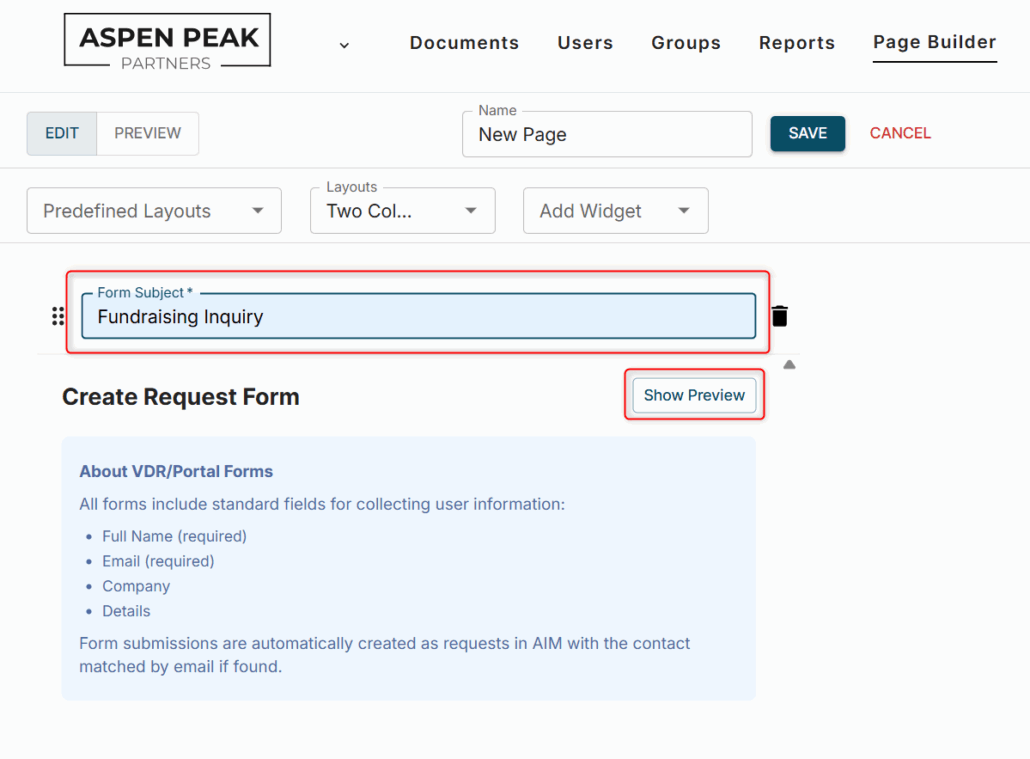
- Click ‘Show Preview’ to see what the Form looks like.
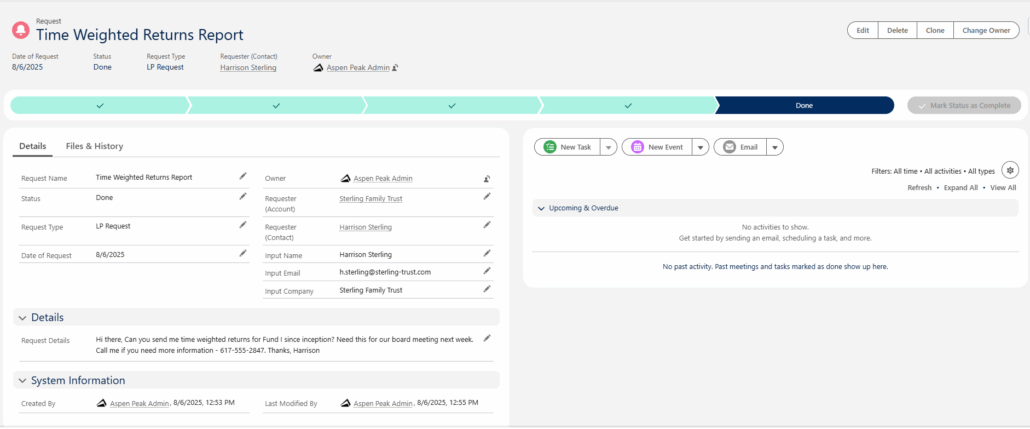
- LPs submit requests through the form, including their name, email, and details.
- Note: The system will go through the following process to match the logged request record to an existing CRM Contact:
- If the logged in VDR/Portal User is linked to a CRM Contact, that Contact record will be related to the logged Request record.
- If the VDR/Portal is not linked to an exisiting CRM Contact record, the system will look for an exact match based on the email address input within the form.
- If an exact match is found, the CRM Contact is linked to the logged Request.
- If there is no match, the request is stored without a Contact association.
- Note: The system will go through the following process to match the logged request record to an existing CRM Contact:
- Requests appear in the CRM, allowing GPs Fundraising and Investor Relations teams to track and respond efficiently.
Steps in the CRM:
- Configure the Contact Page Layout by navigating to Setup and selecting Object Manager.
- Search for the ‘Contact’ object.
- On the left-hand panel, select ‘Page Layouts.
- Click into the Contact Layout. In the blue box on the left side, scroll to the ‘Related Lists’ option and select it.
- Locate the ‘Requests’ related list on the right side.
- Drag and drop the related list into the related list section down the page.
- Click on the wrench to configure the related list. Select the available fields on the left side you’d like to add and click the arrow to ‘Add’ them to the ‘Selected Fields’ section.
- Key fields to include: Request Name, Status, Date of Request, Request Type, and Requester (Account).
- Sort by whichever field you’d like to sort the related list by and select the Descending or Ascending option. Click ‘OK’ and ‘Save’ the Contact Page Layout.
- Return to the front end and open a contact record. Select the ‘Gear’ icon in the top right and then click ‘Edit Page’.
- Once the Lightning App Builder has loaded, on the left side in the ‘Components’ section, search for ‘Related List – Single’. Drag and drop the component onto the desired location within the Lightning Record Page.
- On the right side, edit the Related List – Single component.
- Parent Record = Use This Contact
- Related List = Requests
- Related List Type = Enhanced List
- Number of Records to Display = 10
- Click the ‘Save’ button. A light grey message will appear next to ‘Analyze’ stating ‘Changes Saved’. This message will disappear.
- Click the back arrow in the top left to return to the contact record
- If you’d like to add it to the Account page, you will need to repeat the steps above for each Account Page Layout and each Lightning Record Page.
Please reach out to Altvia Support if you require assistance with the above steps.
Step to add the object to the Navigation Bar:
- Click on the pencil icon in the Navigation Bar (under your Avatar in the right corner).
- Once the pop-up appears, click the ‘Add More Items’ button.
- On the ‘Available Items’ section, select ‘All’ and search for the ‘Requests’ object, select the plus sign to add it, and then click the ‘Add Nav Item’ in the bottom right corner.
- Feel free to drag and drop the ‘Requests’ item wherever you’d like it to appear in the Navigation Bar. Then, click ‘Save’.
- You’ll see the ‘Nav Bar was updated’ message.
The benefit of having the Requests object in the Navigation Bar are for Requests that may not have been associated with a Contact/Account. You will be able to access all records in the ‘Requests’ object.